

7 Popular Hero Section Layouts: Mastering the First Impression on Your Website
Find the best hero section layouts and design tips to make your homepage stand out. Learn essential elements and best practices for higher conversions.


Optimizing website performance can be done in various ways, one of which is by adjusting images. Image optimization reduces file sizes without losing visual quality. It helps pages load faster, improves user experience, and strengthens SEO rankings. It has become essential for any successful website to master it.
Optimization makes your images lighter and more efficient while keeping them beautiful. This practice directly tackles one of the biggest causes of slow websites. Let’s learn more about the concept and practice in website design.
Losing visitors is a guarantee when your website loads slowly. Even a one-second delay can reduce conversions significantly. Images often make up over 50% of a page’s total weight, making them the biggest performance bottleneck on most sites. Therefore, optimization is needed. Good image optimization brings clear benefits:
Search engines like Google prioritize fast websites. Sites with optimized visuals typically rank higher and perform better in image search results. In short, image optimization directly impacts your bottom line.
The size of an image is not solely because it is big or small. The image format also plays a role in determining its size and quality. Each format has unique strengths. It forms the foundation of good image optimization. The correct choice reduces file size while keeping quality high. This decision directly impacts your website speed.
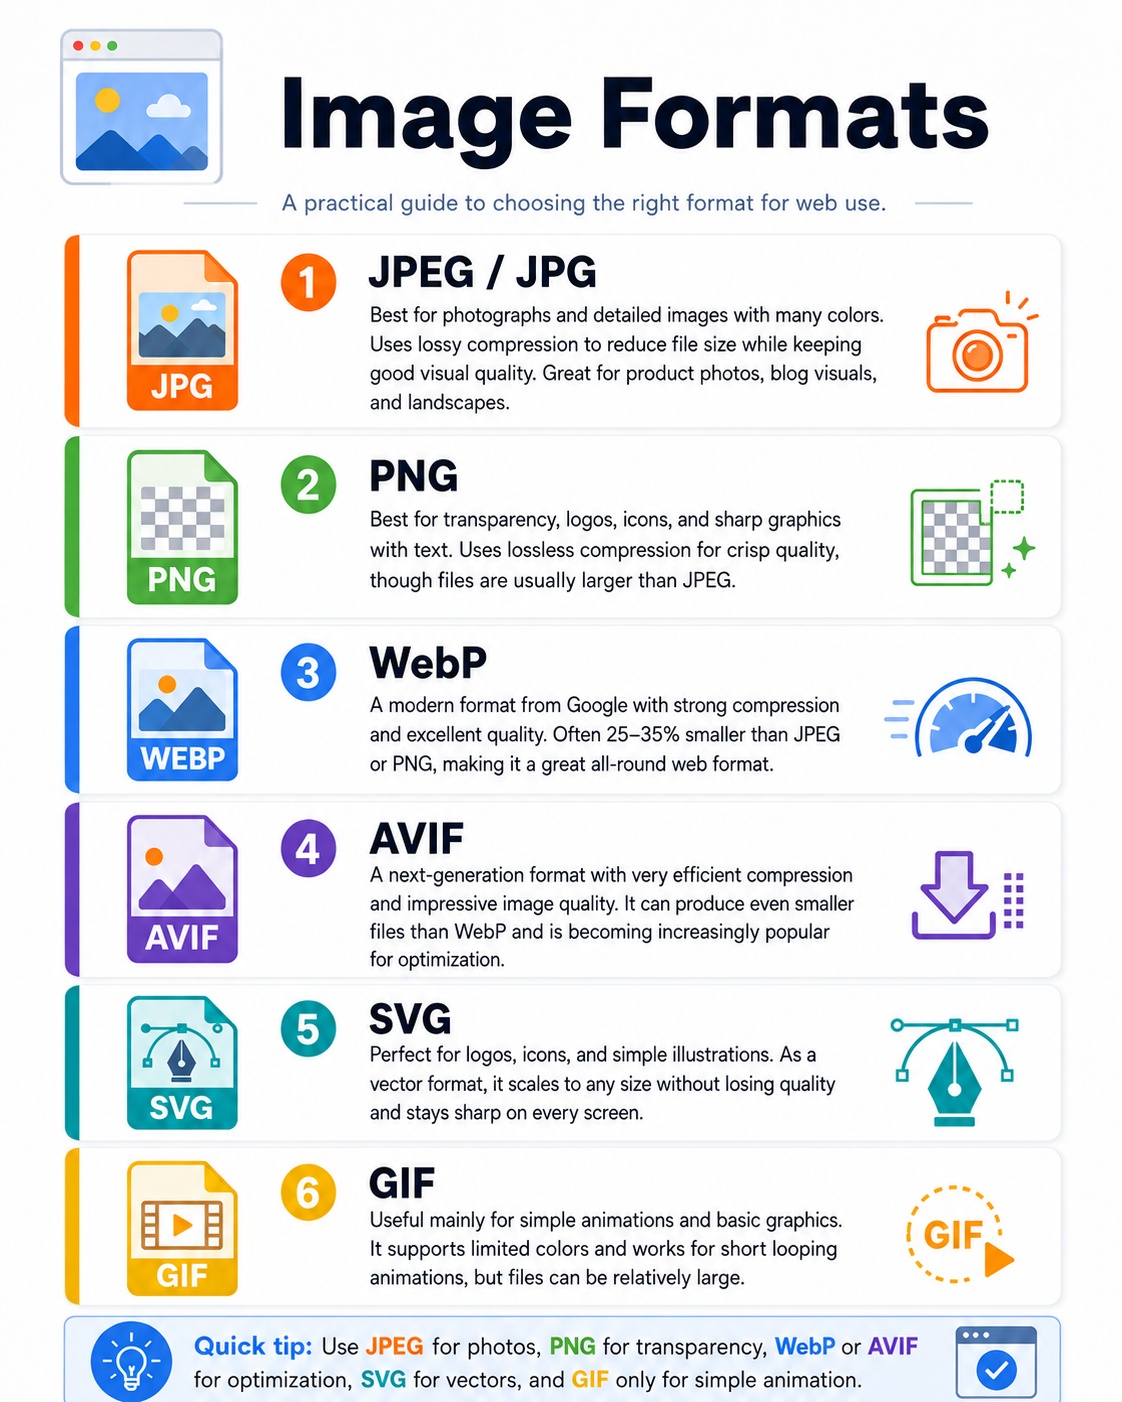
Knowing the right image formats is the first step. Next, you need strong techniques to put them into action. Apply these image optimization methods to help reducing file sizes and, at the same time, improve loading speed and overall website performance.
Always resize images before uploading them. A 4000px photo displayed at 800px wastes bandwidth. Use tools like Photoshop or free online editors to match exact dimensions needed. This single step can cut file sizes dramatically.
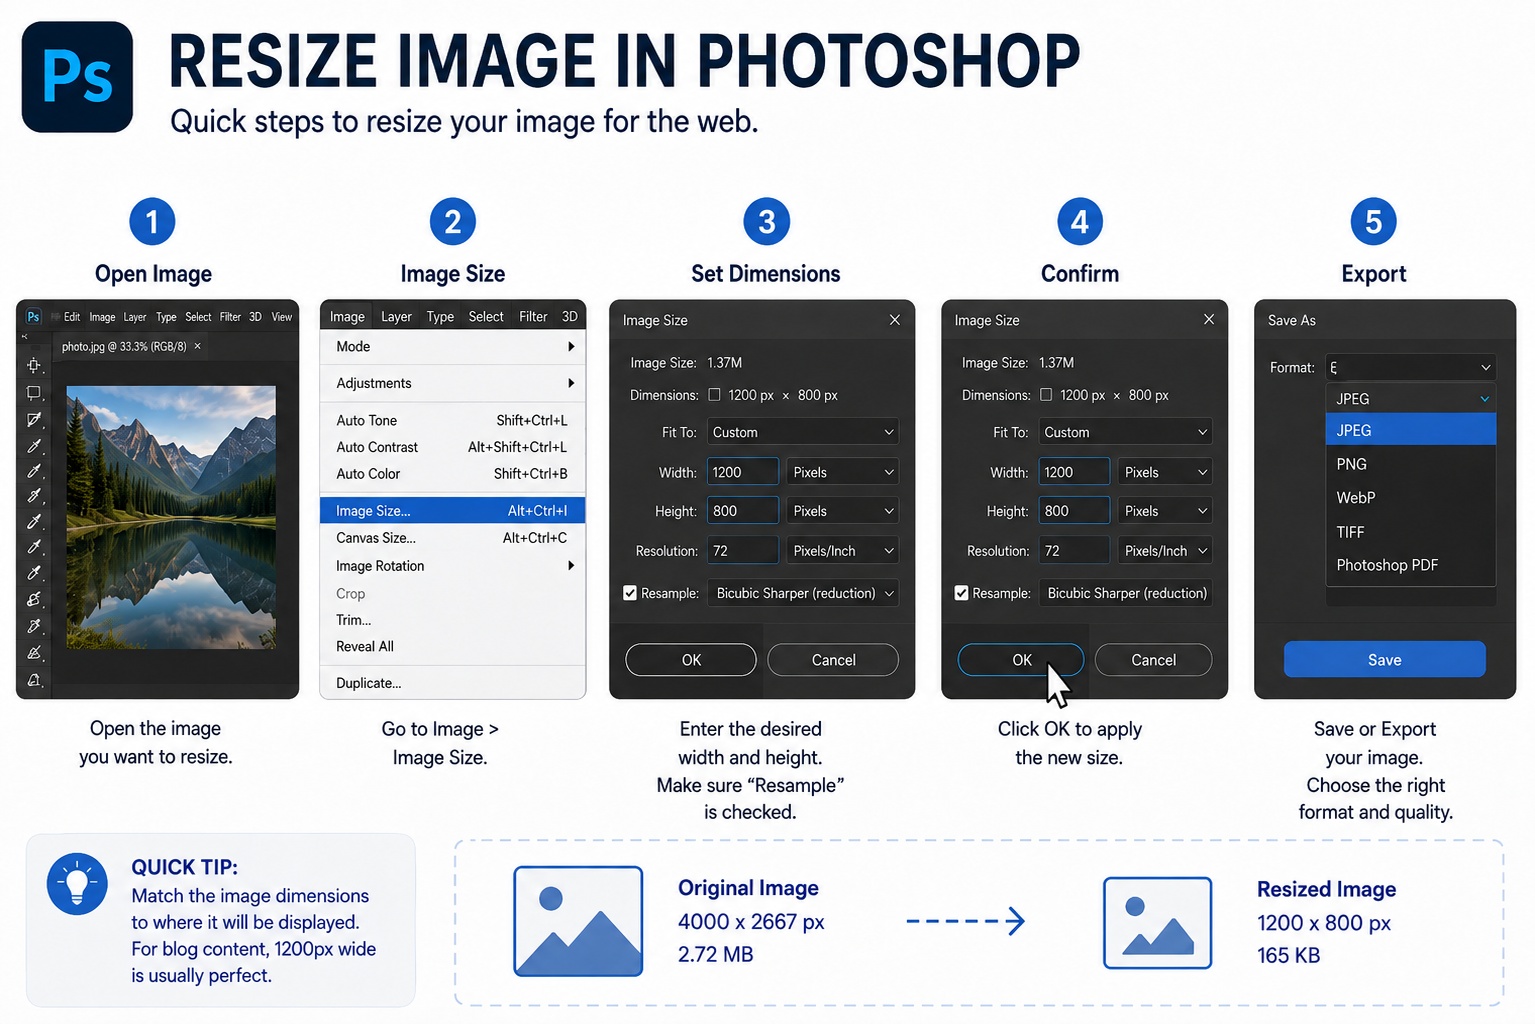
Apply the right level of compression. For photos, aim for 70-85% quality in JPEG format. Test results to ensure visuals stay sharp. Target file sizes between 50-200 KB for most web images. Modern tools make this process quick and effective.
Serve different image sizes based on device screen. Use the srcset attribute and <picture> element in HTML. This prevents mobile phones from downloading desktop-sized images. Responsive image optimization greatly improves mobile performance.
Lazy loading tells browsers to load images only when they enter the viewport. Simply add loading="lazy" to your image tags. This technique speeds up initial page load and saves bandwidth for users who don’t scroll far.
Always specify exact width and height in your HTML or CSS. This prevents layout shifts when images load, improving your Cumulative Layout Shift (CLS) score. Stable layouts create a much better user experience.
CDNs deliver images from servers closest to your visitors. Many CDNs automatically optimize images with format conversion and resizing. This combination of speed and image optimization is powerful for global audiences.
Choosing the right tools makes image optimization much easier and more effective. Many excellent options are available to help you compress, convert, and manage images efficiently. These tools save time while delivering great results for your website performance.
Developers can use libraries like Sharp (Node.js) to automate image optimization in their build process.
Effective image optimization requires avoiding common mistakes while applying smarter techniques. Many websites still make basic errors that hurt performance.
Uploading raw, unedited camera photos is one of the most frequent mistakes. Using the same large images across all devices negatively impacts mobile users. Over-compressing images until they look pixelated damages your brand perception. Forgetting to add proper alt text misses important opportunities for both accessibility and SEO.
To take your optimization further, serve next-gen formats like WebP and AVIF with proper browser fallbacks for maximum compression. Remove unnecessary metadata from image files to save extra bytes. Use progressive JPEGs so images appear to load faster.
Set up proper caching headers so returning visitors load images instantly. Monitor your progress regularly using Google PageSpeed Insights and Lighthouse. Consider implementing automated pipelines that optimize images during content upload. These advanced steps ensure long-term performance improvements.
Optimization is not a one-time solution and process. It has to be done step by step and regularly so it can become a habit to build a better website. How to do it?
Begin by conducting a full audit of all images currently on your site to identify quick wins. Create practical guidelines for your team or content creators, covering recommended formats, ideal sizes, and consistent naming rules. Embed optimization tools into your content management system or development process so every new image is handled automatically. Regularly review performance metrics and make adjustments to keep improving.
Every kilobyte saved leads to smoother user experiences and reduced hosting costs. Whether you manage a small blog or a busy e-commerce site, incorporating these practices into your regular workflow results in consistently faster pages and happier visitors.
Image optimization offers one of the highest returns on investment for website improvement. By combining smart formats, proven techniques, and modern tools, you can build faster, more user-friendly websites that rank higher in search results. Implement these strategies step by step, test with real performance data, and let excellent image performance become second nature for your site.